Page 1 of 3

Another project!

Posted: 17 Dec 2016 14:46
by penman
Hi Guys,
I seem to have accidentally bought another Morini, this time an early 500, 1978 model:

Image

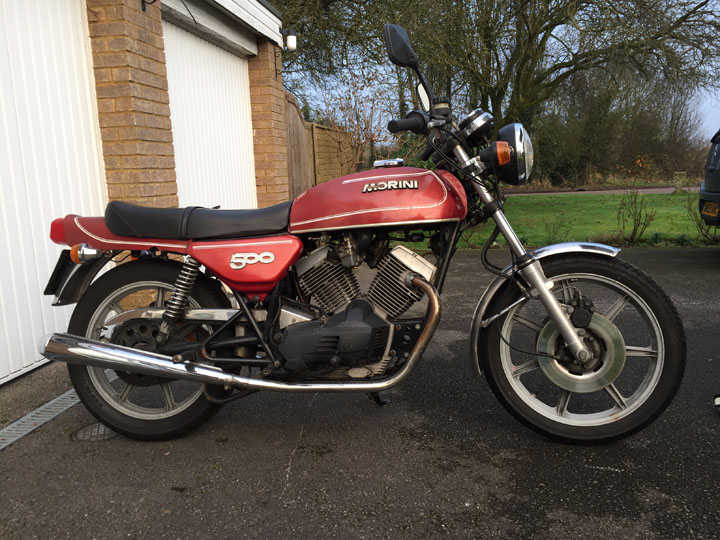
As you can see, it is looking a bit tired, but it'll be a bit different when I've finished! The original paint colour is "strawberry" metallic. It has faded badly, but you can see bits of the original in one or two places such as under the seat. I must admit, I'm not wild about this colour and since I'm no purist either, I'm thinking about alternatives. Suggestions very welcome, but I have been toying with the idea of a darkish blue - any ideas? I do like the pinstripes, so those will be going back on. I can't say much more about it at the moment. I see it as a "non-runner" since it's clearly been sitting for years, so I won't be trying to start it until I've done the carbs, cleaned out the tank, changed the timing belt, etc etc. It does have good compression, so that's an encouraging sign! Now I'm off out to the garage for a closer look and to see exactly what I've got.

Oh just one question, this bike has a kph speedo. Has anyone tried these little kph - mph conversion gearboxes? You fit it in line with the cable and it just applies a suitable reduction so that the existing markings read as miles. They cost around £30.

Regards,
Joe.

Re: Another project!

Posted: 17 Dec 2016 15:11
by 3potjohn
I like that colour-you could do a silver metallic base with candy red over it, assuming the tank has no pinholes. I use POR15 if it does. Seems to have worked for 10-15 years.
I fitted one of those speedo gearboxes ages ago-did what it said it would . And of course you can take it off should you be riding in a country using Km. This assumes your speedo is reading about right of course.
John

Re: Another project!

Posted: 17 Dec 2016 17:54
by Steve Brown
Looks a nice bike! If you do repaint it I think it's always worth remembering that red ones are faster. The candy red suggested above would look very nice in my opinion. I like pinstripes but not that pattern! Funny old world eh? Mind you I don't like marmite but I absolutely love saurkraut. :)

Re: Another project!

Posted: 17 Dec 2016 20:02
by penman
Thanks guys, and I must admit I'm beginning to warm to the original colour now that I've had a look at the underside of the tank - a bigger area and in better condition. However, in the shorter term I've bigger fish to fry!

I gave the bike a good looking over, the carbs, as expected had "early onset varnish", so they've been in the ultrasonic tank and now look brand new. The tank is in great shape and will just need a bit of cleaning. Then I connected a battery to check the electrics. All the lights, etc are OK except that the brake light is permanently on - that'll be a simple fault, no doubt. Then I tried the starter, which spins without turning the engine - not good. I took the r/h cover off to find that the starter drive chain is broken, one of the link pins has snapped in two places. Also, the friction pads on the clutch arms are well and truly worn out. I can only guess that the broken chain is due to the engine having kicked back big time for some reason - or is this a common weakness? I don't know, but I'll be checking the timing very carefully. If anyone has a spare link for one of these chains, do let me know!

I took the plugs out and checked for spark - the front cylinder has a good spark, the rear one a rather feeble spark, but maybe I wasn't getting a good earth, I was running out of time when I checked that. Any kind of spark looks like good news.

A funny thing. The tyres look brand new, there are still "bobbles" out in the centre of the tread which haven't worn off. BUT, they are date coded January '97, so they are 20 years old and unused. I wonder why someone went to the expense of new tyres and then stopped using the bike? Maybe that's when the starter event happened, who knows? I doubt if these tyres will be much good to me after all these years, despite the lack of wear.

One last thing, the airbox has a breather connection in the centre of each air filter. These have been closed off with a bleed nipple cap (neat idea) and about a yard of green insulating tape (not neat). I'm guessing these originally were connected to the rocker box breathers - is that correct?

Many thanks, I'll try to avoid this turning into a restoration blog, though I think I may have quite a few questions coming up! Apologies in advance.

Regards,

Joe.

Re: Another project!

Posted: 17 Dec 2016 21:02
by Steve Brown
Sounds like a good basis for a a refurb. Those breather connections in the air box were originally connected to the plastic breather box above the rear of the engine, just in front of the battery. If it's still there it had a large connection at the bottom to take the crankcase breather, then four small pipe connectors at the top. Two were connected to the rocker covers and two went to the air box. The idea being the suction drew breather gases in and re-burnt it. Early 80's emissions control.
While I'm here, what cleaner fluid do you use for your ultrasonic cleaner/carbs? I haven't found a formula I'm happy with yet.

Re: Another project!

Posted: 18 Dec 2016 09:20
by penman
Steve Brown wrote:Sounds like a good basis for a a refurb. Those breather connections in the air box were originally connected to the plastic breather box above the rear of the engine, just in front of the battery. If it's still there it had a large connection at the bottom to take the crankcase breather, then four small pipe connectors at the top. Two were connected to the rocker covers and two went to the air box. The idea being the suction drew breather gases in and re-burnt it. Early 80's emissions control.
While I'm here, what cleaner fluid do you use for your ultrasonic cleaner/carbs? I haven't found a formula I'm happy with yet.
Thanks Steve, I didn't realise that breather box was fitted as early as this bike (1978), in fact I assumed it was just for the US market. It is fitted on my 1985 K2 but it is certainly not present on this bike. I'll figure out a tidier solution for the breathers. The crankcase breather by the way goes straight up and ends above the rear cylinder head, looks a bit untidy. It's a translucent pipe and I can see a kind of baffle inside the pipe, looks like a spiral but I haven't examined it.

My current fluid for the ultrasonic cleaner is "Carbusonic Engine parts cleaner" - www.carbusonic.co.uk - I bought it on eBay, inevitably. I've tried a few things, including Clarke parts washer fluid, but the Carbusonic one is the best I've used. It does shift petrol varnish reasonably quickly and seems pretty effective on most things. I usually use compressed air to blow things dry afterwards and blow through carburetter passage ways, etc.

Joe.

Re: Another project!

Posted: 18 Dec 2016 10:26
by Steve Brown
Thanks for the link, I'll look into that. You may be right about the breather boxes, I've had 4 500s now and they all had one but I can't say which market they were originally meant for. Does your frame have the brackets for it? The tube you have sounds like the type fitted to the 350s and the baffle you can see works the same way as a labyrinth seal on a Yamaha twin centre crank seal. Very effective too and some bikes seem better with two of them in the pipe.

Re: Another project!

Posted: 18 Dec 2016 21:12
by pedro
And I was thinking that I was the only one who "accidentally" buys Morinis!

Got to say that I love the original colour, not that I have any objection to you painting your own bike in any colour that you like.

Pedro

Re: Another project!

Posted: 19 Dec 2016 12:57
by EVguru
The weaknesses of the starter are generally sticking brushes and worn out worm gears. The gearbox only holds about 20cc of oil and should be regularly checked.

The starter chains are Regina endless type, they're about £25 from NLM (closed until the new year).

NLM have commissioned copies of the later reinforced steel starter shoe I think The extra weight and stiffness helps them work better.

You could have your shoes relined, but getting the correct radius cut on them might require a custom setup.

Re: Another project!

Posted: 19 Dec 2016 16:49
by davel182
If you do repaint it I think it's always worth remembering that red ones are faster.
Could be something in that - there's a blue 350 on eBay advertised as red!

Re: Another project!

Posted: 19 Dec 2016 17:13
by harrymuffin
Timing chain is 3/8" x 3/16" 52 links including the joining link. You can get this standard chain from any bearing stockist for about a fiver or buy a timing chain for a mini which is around seven quid does not need to be endless just like the rear chain.

Re: Another project!

Posted: 19 Dec 2016 19:28
by penman
Steve Brown wrote:Looks a nice bike! If you do repaint it I think it's always worth remembering that red ones are faster.
Well! and there I was thinking it was the stripes which made them faster! I've certainly got a lot to learn!

Re: Another project!

Posted: 19 Dec 2016 19:32
by penman
pedro wrote:And I was thinking that I was the only one who "accidentally" buys Morinis!

Got to say that I love the original colour, not that I have any objection to you painting your own bike in any colour that you like.

Pedro
Oh, I don't restrict accidental purchases to Morini only - if it's got 2 wheels and an engine I'm already well into the danger zone!

The original colour is growing on me. It has to be painted, the camera was very kind to it in the photo above, there are plenty of serious blemishes, too many. But it'll be weeks before I'm ready to do that, so I'll keep thinking about possibilities.

Re: Another project!

Posted: 19 Dec 2016 19:52
by penman
EVguru wrote:The weaknesses of the starter are generally sticking brushes and worn out worm gears. The gearbox only holds about 20cc of oil and should be regularly checked.

The starter chains are Regina endless type, they're about £25 from NLM (closed until the new year).

NLM have commissioned copies of the later reinforced steel starter shoe I think The extra weight and stiffness helps them work better.

You could have your shoes relined, but getting the correct radius cut on them might require a custom setup.
Thanks for the information Paul, useful as always. The chain measures 3/8" between links and the rollers are 1/4" wide, I'm guessing this is a standard chain size, so I may look around. There are 40 links, but I don't know for certain if they are all there, someone else quoted 52 links, so maybe a bit broke off and fell out. It's easy enough to check the length needed though. If NLM sell new chains for £25 or so, it's not worth too much faffing about though!

The starter clutch shoes are another matter, no doubt those will be expensive, but re-profiling the linings (new or existing) would be pretty tricky. I need to have a closer look at those and think about the options.

While it's sitting on the bench, I'll give the motor a bit of a going-over. I hope the gears are OK, there was plenty of oil on the outside of the gearbox!

Regards,

Joe.

Re: Another project!

Posted: 28 Dec 2016 10:21
by penman
Hi Guys,
And I hope everyone had a good Christmas, better than mine anyway, I've been down with some lurgy or other, but much better now.

I had another poke around with the 500 yesterday and found a few depressing things in the starter area - not got much further than that yet!

1. First of all, there is a broken tooth on the starter clutch sprocket:
Image

This sprocket seems to be a very light weight die casting, probably aluminium, it doesn't look like Zamak/Mazak. There is really no wear on it, so unless I can get a new sprocket at a sensible price, I am planning to put this back - the chain will be engaging with enough good teeth to work satisfactorily (I think!). By the way, I got a new chain to replace the broken one - £6 a metre, including postage, and a MUCH better quality chain than the original.

2. The starter clutch shoes have all lost at least one third of the friction lining, which seems to have crumbled away. No solution to this yet, I'll find out the cost of new shoes and also investigate re-lining.

3. Damage to R/H engine cover.

This is the worst problem. When the chain broke, it has impacted the right hand cover, just below the clutch assembly, causing "bursting" damage. The actual point of impact is repairable with something like JBWeld, but there are a couple of hairline cracks from that point, extending all the way to the edge of the cover. I didn't notice any of this until I started to clean the cover for painting. There also seems to be a second point of impact in the region of the hole for the gearchange spindle, again with radiating hairline cracks, but shorter and in a less critical position. Not sure what to do about this. I've thought about carefully making a reinforcing plate from 1.5mm stainless, spending some time bending it to a snug fit. Clamp it in place with 4 small bolts, but sandwich JBWeld between the plate and the (well de-greased) cover to provide the main strength. This depends on there being enough clearance between the cover and the clutch assembly to fit in the plate and its fixings. Hmm, I can't say I'm too happy about this!

4. Armature bearings.

The bearing on the commutator end of the armature feels a bit "gritty". It has also clearly been spinning in its housing in the end cap of the motor, which is now a very loose fit. At the moment I can't get the bearing off the shaft - it's certainly not loose on there! Any suggestions? The bearing isn't sloppy, so I might carefully pick out the seal, wash out and re-pack the bearing in situ and if the seal isn't too badly damaged, put it back. I can't see I've anything to lose by this approach. I can then put the cap back on with a spot of loctite. Any better ideas?

5. Brushes.

All the brushes are sticking (easily fixed) and there is a bit of very minor burning on the commutator, which is really in very good shape. Maybe someone can tell me if these brushes are excessively worn, I don't know how long they are new, but they all measure about 12mm now:

Image

6. Brush plate.

When will it end! When I was dismantling the motor, I noticed an insulated rivet is missing from the brush assembly:

Image

That should be pretty easy to fix, but it just shows, this starter doesn't give up throwing problems at me!

I didn't dismantle the starter gearbox, it feels nice and smooth and there is no backlash. My goodness, it's a right old pain getting oil into it!

The original plan, to re-paint the side cover seems a bit distant just at the moment! I'll get there!

Regards to all,
Joe.