One step forward, then a brief clatter and the engine stopped

250 2c- the Wee-WeeVees
julianharty
Posts: 597
Joined: 15 May 2016 16:34
Location: High Wycombe
Location: High Wycombe Area (Bucks)

One step forward, then a brief clatter and the engine stopped

Post by julianharty »

Some of you have been following along with my rebuild of an old UK registered 250 2C, that last ran around 1988. Today I completed all the remaining tasks before I wanted to try it out on the road (it's registered as a historic vehicle, taxed, and insured, so no immediate need for an MoT). Anyway, there were some niggles in the short ride of about 4 kms which seem par for the course (I'll list these in a reply to this post). The engine fluffed a bit up to about 5k then at 6k rpm upwards ran very nicely and powerfully (for a 250 2C). I didn't exceed about 7.5k rpm.

I then arrived at home and all seemed to be running well enough. A few minutes later I kickstarted it and it ran for about 5 - 10 seconds before a clattering seemingly from within the engine and the engine then stopped and doesn't want to turn over. So it's time to remove the cylinder heads off the engine and see if something's awry with the valves, valve gear, pistons, etc. Next step is perhaps to remove the clutch cover and see if anything (else) is awry in there.

FYI the engine has:
  • Standard bores and pistons, with slightly oversized rings kindly donated by another owner of 250's. The bores are slightly worn at the top, I'd honed them.
  • Standard valves, guides, and springs, etc. I'd lapped the valves in and all seemed well with good compression.
  • Timing was strobed and seemed to be good, carbs had been fully cleaned.
  • The entire top end and carbs had been bead blasted with Paul Compton's help and then washed, cleaned again, and blown through with an air compressor.
  • I'd removed the clutch cover, replaced the gasket, cleaned up internally, and used 20/50w oil.
The bike had 21k kms on the speedo counter. No idea how accurate this is however as the bike hasn't been used for over 35 years.

I'll post some updates once I've investigated. Thankfully I've got a spare 250 2C engine (planned for a second bike) if there damage is severe.

Here's hoping that the issue is minor and relatively easy and inexpensive to resolve. Suggestions are welcome, and I might ask for some spare parts so I don't have to cannibalise the spare engine!
julianharty
Posts: 597
Joined: 15 May 2016 16:34
Location: High Wycombe
Location: High Wycombe Area (Bucks)

Re: One step forward, then a brief clatter and the engine stopped

Post by julianharty »

Here are some pertinent details of the final preparations; and then the immediate symptoms found during the first test ride.
  • The 5mm petrol inlets on the carbs (see viewtopic.php?p=44416#p44416) are about 2mm shallower than the original inlets so petrol leaked from around their side wall as the 6mm hex bolts weren't short enough to accommodate the difference. I fitted an extra dellorto fibre washer and a plain s/steel m6 washer to each hex bolt as a temporary workaround.
  • The bike doesn't like idling for long. Fortuitously at the MRC Rally last weekend I'd bought a set of old ATG issues including issue 222 where on pages 20 and 21 Mark Bridger had written about exactly this issue with recommendations on how to improve the idling and other details about these fine bikes. I'll follow up on this topic once I resolve whatever's caused the clattering in the engine i.e. when I can complete my testing of his recommendations.
  • The engine was stuttering up to approximately 4.5k rpm; I get the impression reducing the pilot jet size might help address this in a similar way to reducing the pilot jets on the 350 engine to adapt to modern petrol (I'm using Esso Supreme currently in the 250 2C).
  • Connecting the wires to the rear light unit was very awkward with it fitted to the rear mudguard and I ended up removing the number plate and the number plate bracket from the rear mudguard to wire up the bike.
  • I've fitted LED indicators and the new orange flasher unit flashed them OK when the loom was off the bike but not when the loom, etc. were fitted on the bike. I've wired 'earths' throughout the bike rather than relying on the frame to conduct so I think it's a quirk of the orange flasher (about £4 on amazon) and thankfully I had a blue one that does drive the LED indicators acceptably.
  • The throttle cables have the same part number as the cables for the 350. I had new cables made by Venhill. Both the old and new cables need the inline adjuster on the carb tops to be fully wound out which isn't ideal. I'm going to explore making a custom twin throttle insert for the tommaselli throttle body that will take up about 6mm of the difference in the lengths of the outer to inner ratio (about 77mm, IIRC)
  • The front tyre was vibrating as I'd not fully seated the new tyre.
  • The steering bearings are now slightly loose (new ball bearings in the old cups and cones).
Another detail is the fuel tank is power coated on the outside (as is the frame, and the mudguards, etc.) This is partly an experiment and if it doesn't react with modern petrols then I may have the tank and mudguards painted on top of the power coating once the bike's bedded in and running acceptably.

My first impressions of the bike is that it'll be great fun to ride once I've addressed the various snags found so far, and whatever is causing the engine clattering. More news as and when I learn more.
MickeyMoto
Posts: 2620
Joined: 22 Nov 2008 17:41
Location: Even further oop North

Re: One step forward, then a brief clatter and the engine stopped

Post by MickeyMoto »

Belt ok?

Valve collets changed?

God job its an old clunker... :)
mbmm350s
Posts: 706
Joined: 22 Jun 2018 10:18
Location: Reading UK
Location: Berkshire UK

Re: One step forward, then a brief clatter and the engine stopped

Post by mbmm350s »

Thats a bit of a nuisance.

On the several occasions this has happened to me the engine had seized, :(
Hoping its less serious.
Clutch cover removed so did you check the green neoprene seal was good and replaced correctly. Did you clean and check the oil pressure relief valve?

I havent changed any pilots on our 250s and they run standard jets. The older one needs new slides and has some hesitancy in midrange but its done 78000 miles.

Mark
mbmm350s
Posts: 706
Joined: 22 Jun 2018 10:18
Location: Reading UK
Location: Berkshire UK

Re: One step forward, then a brief clatter and the engine stopped

Post by mbmm350s »

Also and for anyone following on here.
Do not use the torque settings from the blue book as they apply to the 250 single. Use the torque settings from the user manual, which i think Richard P on here has transcribed.
Mark
julianharty
Posts: 597
Joined: 15 May 2016 16:34
Location: High Wycombe
Location: High Wycombe Area (Bucks)

Re: One step forward, then a brief clatter and the engine stopped

Post by julianharty »

Thank you Mark and Mike.

I fitted a new belt using talcum powder after rotating the engine using the old belt to try to remove any rust from the pulleys. I torqued the heads to roughly 2.4 mkg using new base gaskets and annealed 250 2C head gaskets. I'll check the figures from the user manual for the bike, thank you.

I was somewhat concerned about whether the green neoprene seal might have been inadvertently knocked out of place when I refitted the clutch cover as it was a bit of a grump to refit. It was in good visible condition. However when I refitted the cover I couldn't work out any practical way to check whether the neoprene seal was in place unless I removed the cover again (a bit like Schrödinger's cat) and there's no current way to measure the oil pressure. I had cleaned the oil pressure relief valve but didn't actually test it as I don't have a suitable type of oil pressure can. Perhaps now's the time for me to buy a suitable oil can!

I reused the old valve collets. The entire valve train was cleaned in Paul Compton's bead blaster; I then lapped the valves in. Are new valve collets recommended? I can see Douglas has two types listed https://www.mdinaitalia.co.uk/M130406.html and https://www.mdinaitalia.co.uk/M130421.html I'll check which ones are used in the engine and buy replacements if they're visibly worn or if you recommend I do so.

It's odd that it failed in this way at tick over after restarting the engine shortly after the test ride. I'll learn more when I start to investigate. I've decided to wait at least 24 hours to allow my emotions time to settle and to restore a sense of balance and serenity in the hope that'll also help me be more observant and diligent :)
MickeyMoto
Posts: 2620
Joined: 22 Nov 2008 17:41
Location: Even further oop North

Re: One step forward, then a brief clatter and the engine stopped

Post by MickeyMoto »

As you said earlier, start by removing the top end, it is easier than removing the clutch cover.

I would not necessarily replace the collets, but you have rebuilt the valve gear.

I hope it is something simple.
mbmm350s
Posts: 706
Joined: 22 Jun 2018 10:18
Location: Reading UK
Location: Berkshire UK

Re: One step forward, then a brief clatter and the engine stopped

Post by mbmm350s »

I reused the old valve collets. The entire valve train was cleaned in Paul Compton's bead blaster; I then lapped the valves in. Are new valve collets recommended? I can see Douglas has two types listed https://www.mdinaitalia.co.uk/M130406.html and https://www.mdinaitalia.co.uk/M130421.html I'll check which ones are used in the engine and buy replacements if they're visibly worn or if you recommend I do so.
As far as I know 250 2C only ever used the later type collets and caps https://www.mdinaitalia.co.uk/M130421.html

If collets are readily available then I would replace, but necessary to replace - depends on how rusty or damaged they were.

Top end off first for sure. Is engine still locked? If so then I doubt a piston seizure.
If you pull the clutch lever - does the kickstart operate?

difficult to check oil feeds on these bikes, no oil pipes to crack open or that interminable wait for oil to return to the tank..

Mark
julianharty
Posts: 597
Joined: 15 May 2016 16:34
Location: High Wycombe
Location: High Wycombe Area (Bucks)

Re: One step forward, then a brief clatter and the engine stopped

Post by julianharty »

I've made progress with investigating the cause of the clatter and the engine not turning over. In short, it seems an M6 flat washer stopped play inside the rear cylinder. The spark plug was badly damaged and unfortunately removing the spark plug from the head before I removed the cylinder head stripped most of the spark plug thread. There's superficial markings on the head near the spark plug.

Any guesses which washer this was (I think it's a Morini one as I generally use stainless steel ones? and where the washer came from? (I don't think it's from the M6 cap head bolt that holds the cylinder head in place, at least that one was still on the cap head when I removed the head.)

I've searched the forum and I can't see any posts about rethreading the spark plug thread. Any recommendations are most welcome.

My next steps are in my next post here.
close up of damage to spark plug.jpg
close up of damage to spark plug.jpg (453.1 KiB) Viewed 6375 times
sparkplug and errant washer.jpg
sparkplug and errant washer.jpg (501.81 KiB) Viewed 6375 times
rear cylinder head damage.jpg
rear cylinder head damage.jpg (507.05 KiB) Viewed 6375 times
julianharty
Posts: 597
Joined: 15 May 2016 16:34
Location: High Wycombe
Location: High Wycombe Area (Bucks)

Re: One step forward, then a brief clatter and the engine stopped

Post by julianharty »

My planned next steps include:
  • Cleaning up inside the rear cylinder to remove the aluminium and any other remaining debris. It's mainly aluminium threads from the spark plug hole.
  • Check the rear piston for any signs of significant damage.
  • Remove the valves and investigate in case they or the inlet/exhaust ports provide any clues about the washer's journey before it ended up in the combustion chamber.
  • Clean up the cylinder head generally and materially if recommended to do so.
  • See if I can track down where the errant washer came from.
  • Find a good way to repair the spark plug thread and get it done either by someone else or myself.
  • Hopefully, reassemble and check compression of the front and rear cylinder before test riding it (with a new spark plug for the rear, of course).
I'm happy to amend this list based on recommendations, etc.
MickeyMoto
Posts: 2620
Joined: 22 Nov 2008 17:41
Location: Even further oop North

Re: One step forward, then a brief clatter and the engine stopped

Post by MickeyMoto »

Ouch.

Careful when you remove the barrel in case any swarf is dragged down the bore. Might be worth oiling around the piston.

You probably need a helicoil or similar. This will require a drill to be at the exact angle. I would not attempt it. Look in the classic bike mags for people who can do it. Might be worth checking the other head, too.

The washer must have been in the cylinder when you rebuilt the engine, I doubt it would have come through the inlet port, unless it dropped in from the inlet manifold before you started the engine. The only washer close enough that thickness would be in the pushrod tunnel but that would go on after the head was attached. I think you would have noticed an errant washer on the piston crown.
mbmm350s
Posts: 706
Joined: 22 Jun 2018 10:18
Location: Reading UK
Location: Berkshire UK

Re: One step forward, then a brief clatter and the engine stopped

Post by mbmm350s »

Hi Julian,

Doesnt sound too serious. :)

Helicoil of plug threads should be fine.

Are you sure its an M6 and not perhaps an errant M7 from the rocker studs? These washers seem to have a bevelled edge and are generally a little thicker than standard form washers.

Might be worth removing valves on that cylinder and check they are still straight.

Anyway shouldnt be too much to get it fixed which is a relief.

Mark
mbmm350s
Posts: 706
Joined: 22 Jun 2018 10:18
Location: Reading UK
Location: Berkshire UK

Re: One step forward, then a brief clatter and the engine stopped

Post by mbmm350s »

Of course that washer could have been in the engine for decades and disturbed from its slumbers.
mbmm350s
Posts: 706
Joined: 22 Jun 2018 10:18
Location: Reading UK
Location: Berkshire UK

Re: One step forward, then a brief clatter and the engine stopped

Post by mbmm350s »

I wonder how bad the plug thread is could it be recut? If not a proffesional thread insert would be needed
julianharty
Posts: 597
Joined: 15 May 2016 16:34
Location: High Wycombe
Location: High Wycombe Area (Bucks)

Re: One step forward, then a brief clatter and the engine stopped

Post by julianharty »

MickeyMoto wrote: 10 Jul 2024 06:46 Ouch.

Careful when you remove the barrel in case any swarf is dragged down the bore. Might be worth oiling around the piston.

You probably need a helicoil or similar. This will require a drill to be at the exact angle. I would not attempt it. Look in the classic bike mags for people who can do it. Might be worth checking the other head, too.

The washer must have been in the cylinder when you rebuilt the engine, I doubt it would have come through the inlet port, unless it dropped in from the inlet manifold before you started the engine. The only washer close enough that thickness would be in the pushrod tunnel but that would go on after the head was attached. I think you would have noticed an errant washer on the piston crown.
Thanks for the tip on checking for and removing any swarf. I'm going to vacuum first, then I'll add some oil around the bore, and do whatever I can to minimise any swarf remaining in the piston/head/barrel/rings/engine.

I watched several hours of videos online and also compared various approaches to repairing the spark plug thread to decide which method looked most promising and then somewhat connected who should do the work (me, my local motorbike shop where I know several of the mechanics, or a specialist).
  • The best quality repair is probably one using the Würth timecert inserts. Their tooling for the inserts looks to work phenomenally well in terms of aligning the repair, cutting seats, etc. The main downside is cost, probably £400 for the kit and roughly £20 per insert in small volumes (dropping to £15 for a pack of 10 of the longest M14x1.25mm insert they sell, 16.8mm).
  • There are numerous 'knock-offs' that have similar approach to cutting the thread and seats, etc. for 1/5 to 1/10th of the Würth tooling. For example from Sealey, Neilsen, and from US Pro. Reviews of these and other very similar products generally complain the inserts are poor quality in some circumstances (but generally OK in aluminium head material).
  • There are even more basic tools, some with a drill and a single tap, some simply with a tap, and then various inserts. These are as little as £10 - £15 ish. None looked worth using.
  • Genuine HeliCoil kits are available for £61, and similar offerings range from over £110 to under £20. I just discovered I'd bought one of these and squirrelled it away :)
  • Specialist aluminium welding and recreating the thread.
Last night I ordered the kit from US PRO, their "Tools Thread Repair Kit For Deep Seated Spark Plugs M14 x 1.25 NEW 5916", no less. It cost about £45 including p+p. When this arrives I'll have two choices I can try using (the inexpensive helicoil look alike) and the US Pro kit that uses inserts.

I'm reasonably confident the US PRO tooling would align the new thread in the cylinder head adequately. Here's the video that convinced me https://www.youtube.com/watch?v=CYdSqWDWSFU which admittedly uses the genuine Würth tools and inserts. Optionally I could set up a test on a sacrificial head e.g. using a more knackered cylinder head (I have one with widespread erosion similar to viewtopic.php?f=4&t=7787 but more widespread slightly shallower cavities) or or piece of aluminium of a similar thickness (I don't have any suitable blocks though).

I suspect the helicoil look alike would also be adequate and less prone to 'the insert being too large a diameter to fit' as reported by people who'd bought the Neilsen kit for example https://www.amazon.co.uk/Spark-Thread-R ... 00J06J3M6/

In terms of the source of the washer. I agree the two most likely sources are when I was fitting washers to either the M7 rocker block or the M6 cap head bolt for the pushrod holes. I did faff around with various lengths of the M6 cap head bolt (30, 35, 40 mm thread lengths) as the old ones weren't to hand; and I might well have tried 2 washers on the 40mm thread length. Any of this work though would have been when the head was on the barrel, either before the head was bolted down or afterwards. I probably fitted the spark plugs after the rockers were fitted but can't remember the details. So there's the potential for the washer to have entered via the spark plug hole.

However if the washer entered when I assembled the engine why didn't it make an appearance earlier? I'd run the engine many times (at least 20 times) over the last few weeks, mainly in neutral outside the garage and only up to about 4k to 5k rpm with a temporary fuel tank and very brief 10 metre rides on the drive to see if the gears engaged, and to free the wet clutch. I fitted the airbox relatively late in the process; I'd split it to check the filter and to clean it. There are M6 flat washers used to hold the airbox to the frame but highly unlikely that they'd end up in the internal area of the air box in my view.

The clattering only happened after the test ride on the road and the damage looks consistent with infrequent contact with the head and valves. Also the bike was probably running on both cylinders (and the rear seemed the livelier of the two). The washer could have rested in one of the cutouts for the valve pockets in the piston but that seems unlikely that it would only free itself / move after the test ride when I restarted the bike on the drive.

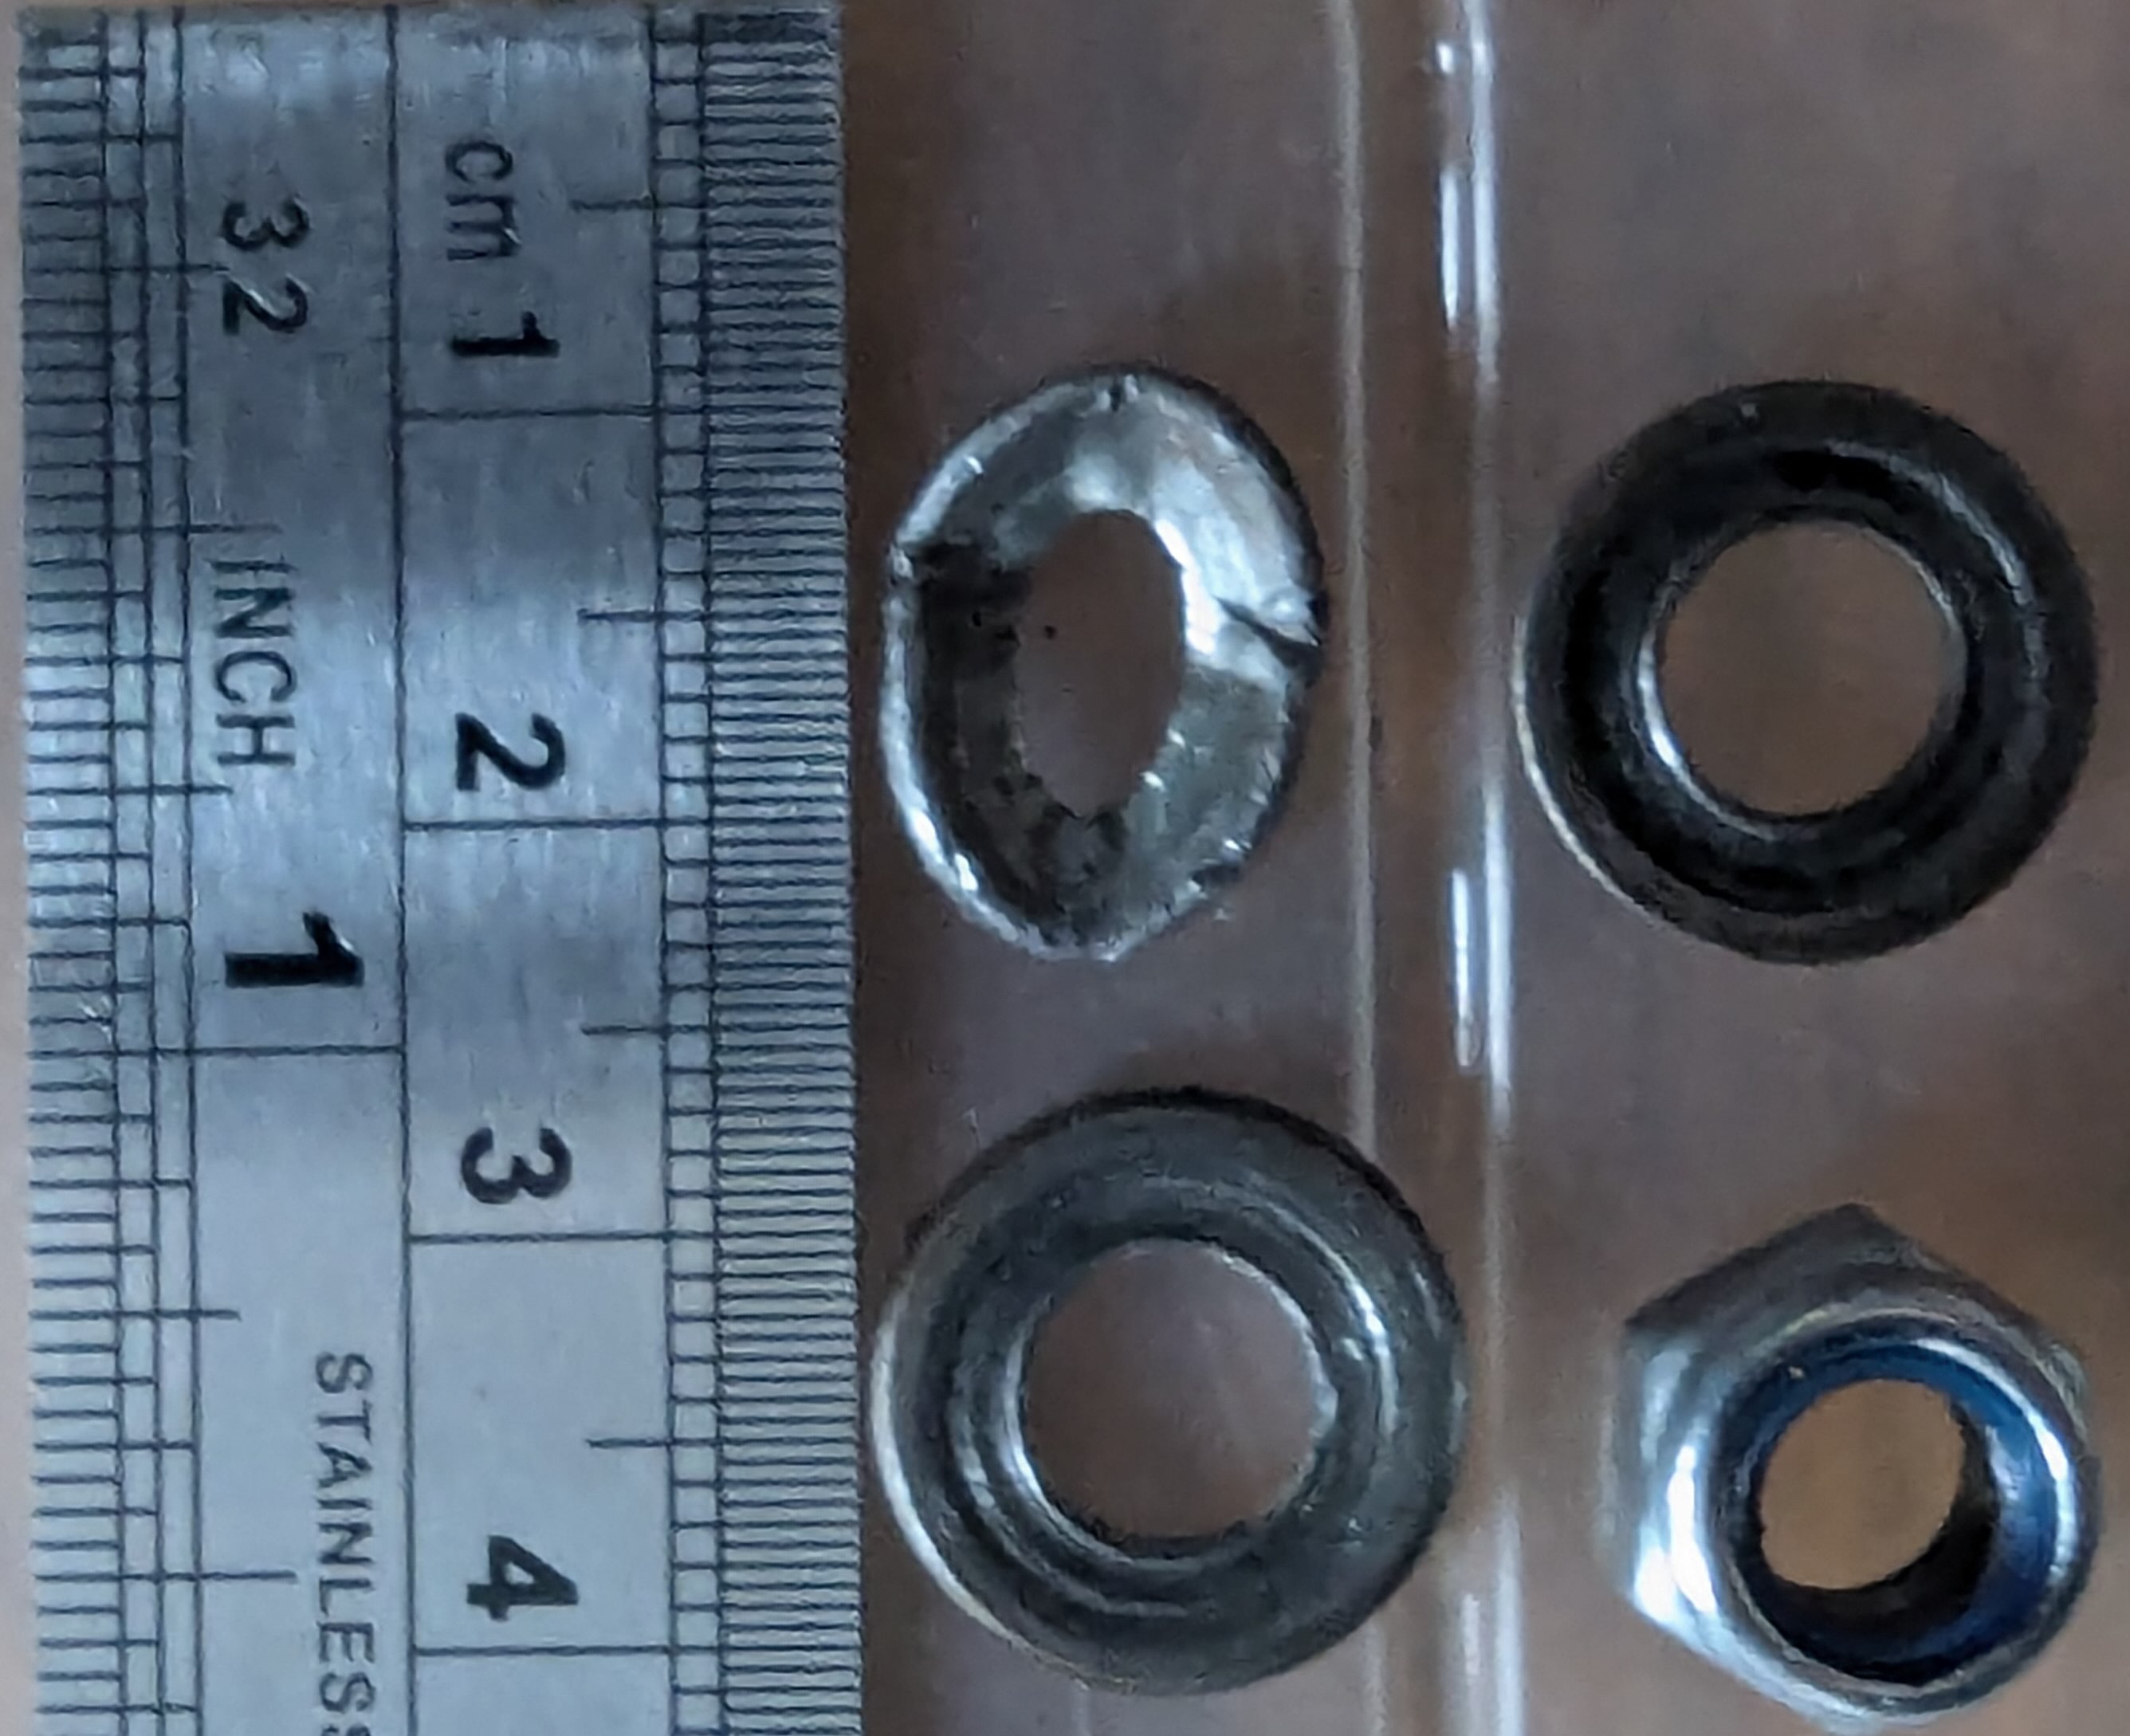
I've taken some measurements of the damaged washer and the M7 rocker washers. I used a low cost but reasonably good micrometer, the rule is to help show scale on the photo. All measurements are approximate owing to the limitations of the measuring tools I used and my abilities in using them.
  • M7 rocker washers are: 14.2mm OD, 7.0mm ID, 1.4mm thick. Measured difference in radius 3.5 to 3.7mm.
  • Damaged washer's dimensions have mins and maxes because of the oval shape of it: OD max 14.3mm min 10.5mm, ID 4.1mm to 7.1mm, thickness varies between 1.3mm and 1.7mm, most of it is 1.4mm. Measured radius 3.3 to 3.4mm.
Visually the damaged washer has a different profile; as Mark observed the M7 rocker washers seem to have a bevelled edge, this washer doesn't have the same profile. I'm leaning to it being an M6 washer rather than one of the M7 rocker washers but not 100% confident in this assessment. I've found standard dimensions for M6 and M7 washers online e.g. M6 A2 OD = 12mm and M7 A2 OD = 14mm on the accu.co.uk website.
damaged washer compared to rocker m7 washers.jpg
damaged washer compared to rocker m7 washers.jpg (503.34 KiB) Viewed 6348 times
PS: Yes I hope I'd have noticed a washer sitting on top of the piston! :) IIRC I'd fitted the cylinder heads, etc. while the engine was in an engine stand; and that I'd done the tappet adjustments with the engine in the frame. However I may have misremembered especially as I've got a lot of other stuff going on.
Post Reply